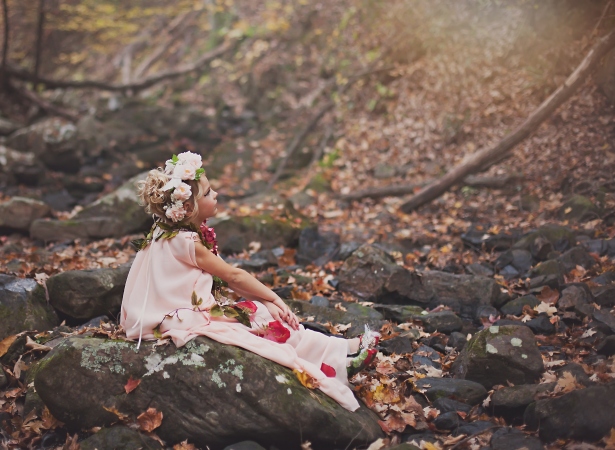
Child Fairy/Wood Nymph Costume

When my daughter asked to be a fairy for Halloween I of course didn’t just buy a fairy costume on Amazon or throw a pair of wings on her dance tutu. I made her become a fairy.


I think it turned out rather fabulous. It was pretty simple to make although fake flowers are wayyyyy more expensive then I thought they’d be.

I made the underdress out of some scrap satin– just a tube dress with ribbon spaghetti straps. I put elastic around the top so that it would go on and off easier. The pink is just chiffon sewn into 2 long rectangles and then criss crossed over her body and tacked in place. I really just sewed it together how it looked the best. If I wanted it to be more gathered in one spot I sewed it there. I knew that with all the flowers on there that washing isn’t an option so that made it so much easier to just sew it how it looked best.


It went together like how the fairies on Sleeping Beauty sewed her dress. Well kinda. It wasn’t at all like sewing a real gown, but it looked beautiful and that’s all that counts right?


The crown is grapevine with flowers wired on and the shoes were old slippers with flowers hot glued on.


This whole project was very much made up as I went along. I held up the flowers/vines to the dress and if I liked it I sewed it on.


But come on. ..

img_9179


Professional photos done by Kim Chaffin Photography


What happens when I decide to make a Pilgrim costume for my child? Well. . .

20141117_17120620141117_171030 20141117_170954 20141117_170934 20141117_170923 20141117_170854 20141117_170803 20141117_170715 20141117_170702 20141117_170403

Hester Prynne

Hester Prynne

I embroider a red A to her chest and take photos of her with her baby doll. Because that’s normal. Hopefully when she get to high school and reads The Scarlet Letter she will find this amusing and not reason for therapy.

On a sewing note I used Simplicity 3725 and it was super easy and went together well. You know, just in case you need an Hester Prynne costume a pilgrim costume for your kid.

Best Halloween Mashup? That’d be Lil’ Jon the Baptist.

I have a friend that is a priest in Knoxville and he dresses up at Halloween mashing up a Biblical character and a pop culture figure. He has out done himself this year. Ladies and gentleman I present, Lil’ Jon the Baptist:

Yaaaayuh! Kneel down for WHAT?!

I am in awe of his costume and if you start having a rough day– just think about this guy working at his church today– dressed like this.

This isn’t his first inspired costume. Last year he was Doubting Thomas the Tank Engine:

And the year before he was Father Abraham Lincoln:

He has also been Pontius Pirate

Have suggestions for next year? Sound off in the comments.

Edit: 2016 brings Apostle Paul Bunyan!

Harry Potter Baby Shower

What other kind of baby shower would you have?? (OK maybe I’d have taken a Narnia, Supernatural, or any of my other obsessions, but Harry Potter is very high on my list).  A group of us get together every few months and play Harry Potter Scene it, eat Harry Potter food and generally nerd out.  So now that one of us was pregnant it’s natural that we should have a Harry Potter baby shower.  Right?  To be fair, this lovely lady’s Mother in Law organized everything.  So I can’t take credit for anything, but I’m going to share the awesomeness in this post.

She got a ton of Harry Potter baby gifts, we had Harry Potter BINGO, and Butterbeer milkshakes.  Yeah it was pretty awesome all around.  Flip through the slideshow to see all the cool stuff.  And please– if you know a pregnant Harry Potter fan– do this.  My baby showers were very bland in comparison.

This slideshow requires JavaScript.

One last thing to leave you with– Holly’s MiL called in the cake order and the person at Food City definitely wasn’t a Harry Potter fan– or someone who knows how to spell the name Russell, because here’s what they made her first:

20140104_164611

Needless to say they called for a replacement and got one that actually said Muggle and Russell.

Wade's cake

Wade’s cake

Much better.

Pink Ariel Dress Tutorial

I had already planned on making my daughter a Cinderella gown for her 4th birthday and to take to Disneyland this Christmas, but then a friend of mine asked if I could make Ariel the Little Mermaid’s pink gown for her daughter for a Christmas present.  Evidently the pink one isn’t as readily available and Etsy has them for the low low price of $300.  So after some Googling I decided that I could alter my Cinderella pattern to be able to make both dresses at once.  And then of course decided that I couldn’t make just one pink satin dress and then, in my daughter’s eyes, get rid of it.   So here’s how I did it.  I tried to break it down  as simple as possible, but if you don’t understand something, just ask!

Arielpinkl

I used Simplicity Pattern 2817  and then just made adjustments to make it look like the Ariel dress. A 3 year old doesn’t need so much cleavage (or really any), but I do think that puffed sleeves and skirt volume is a must.  I used a costume pink satin and then used a stiffer white special occasion fabric to add body.  I added a crinoline to my daughter’s, but the one I sold didn’t have one so I wanted it to have enough shape to not look limp while she was playing in it.  I didn’t want to add tulle because although tulle is cute, it’s itchy and bunches.

I made the top just as it instructed, but I would recommend cutting the front piece on the fold of the fabric. I don’t understand why they want you to sew that together.  I did it with this dress, but not when I made the Cinderella one.Just keep in mind that you need to shift the pattern off the fold the length of the seam allowance or it will make the front bigger than the stated size.  Unless that’s what you’re going for. I also added interfacing down the back because I didn’t put in buttons, but eyelets and lace. Here’s photos of progress so far:

This slideshow requires JavaScript.

I lined it in the stiffer white.  Lining is a lot cheaper, but like I said I wanted this to hold up and the pink satin wasn’t real sturdy. Also I top stitch everything that could ever possibly need it.  I think it looks neater and helps hold everything together.

Now we come to the part where I changed things.  I wanted puffed slashed sleeves so I used the sleeve pattern for the Snow White dress instead of the Cinderella sleeves.  That means a different sleeve and it also had an armband at the bottom of the puff.  Now I cut out 2 pink and 2 white.  You don’t really have to cut the white into the sleeve shape, I just found that easier to keep track of everything.  So what you do is you then cut all the sleeves into strips and sew the white strips in.  That makes sense right?  Well here are some visual explanations:

This slideshow requires JavaScript.

I stack them all up and then cut them together so both sides match.  The thing to make sure is that it starts and ends in pink and that you keep the pink strips in order.  You will use ALL pink strips, but not all the white ones.  This method kinda wastes fabric, so if you have a better idea– DO IT!  OK once they are sewn together they will look kinda messy, but don’t worry, we’ll fix that.

The next step is to sew the pink sections together at the top and bottom leaving the space in the middle open.  Now it should look more like the original sleeve, but it will have white sections like Ariel.  Turn the sleeve over and trim and clean up the white.  Right here is when a serger comes in handy.  It cleaned up the area and cut off the white at the same time.  Here’s what you should have now:

This slideshow requires JavaScript.

DO NOT ATTACH THE SLEEVES YET! Ariel has long sleeves so after I sewed the arm banding on the bottom of the sleeve I added a long pointed sleeve.  You can make this pattern but making the top as wide as the arm banding, from the middle of the banding measure down how ever long you need the sleeve to be plus 1/2 inch, then 1/2 inch below the bottom draw a line as wide as you need the wrist to be (make sure it will be loose enough), connect the ends of the wrist line to the ends of the armband lines.  Once again that’s really confusing so here’s a picture:

20131125_180004-001

I then finished the pointed end of the sleeve then attached it to the same seam where the sleeve and armband meet.

This slideshow requires JavaScript.

OK then just attach the sleeves as the regular pattern calls for it just make sure that you have the armband facing the right direction.  Believe me (not that I would make that mistake– *cough cough*).  Now you have this!

20131126_160536

Yay!  It’s starting to look like more than a mess of fabric!

So I’m sure you see the skirt next to her on the dress form.  The pattern has 2 parts for the skirt, a side and back piece and a front piece.  For this dress I cut all pieces out in the white and cut out another set of side/back pieces in the pink to make an overskirt.  I sewed the pieces of the white together like the pattern asked, then sewed the two pink ones together, then attached the pink and white at the top of the skirt leaving an inch free at the edge of the pink that meets the center front piece (that way I could finish the edge down the front easily.  I had this:

20131125_143647

looks fantastic right?  OK not so much, but trust me on this.  I trimmed up the front of the pink so that it had a more sloping gradual opening then I attached the skirt to the top.  The white front piece I gathered between the darts on the top  and then distributed and gathered the pink the rest of the way around.  Ta da!  You’re almost done!

20131126_165054

I have serged all my edges which makes the hemming a lot easier.  I made the pink skirt shorter than the white to reflect the Ariel dress a little more.  After I was all done hemming I added the eyelets and just used pink ribbon.  I like to mark all the eyelets on one side and then do the other.  I find that makes them look much more even then trying to do both sides at one time.  Here’s the back:

20131202_123434

This dress is the one I sold and she is a couple sizes bigger than my daughter, so that’s why I left the ribbon long and the dress is a bit big.  I also had issues getting my little girl to stand still.  I’ll try posting some more detailed shots when she wears this in Disney.  Surely she’ll get tired and sit still at some point right??

Here’s some more photos and if you want to know how I made my super easy, non itchy crinoline keep reading.

This slideshow requires JavaScript.

OK for the crinoline I bought an old square dance crinoline on eBay and cut it to be 4 inches wider than what she needed it to be, serged the back together leaving the cotton portion open for easy on and off, ran some twill tape through the old elastic casing and voila!

It’s soft and washable.  I can use it with any of her gowns.  Cause, yes she has gowns.  Speaking of which pictures of her Cinderella gown will be up soon.

Rapunzel and Flynn join the DragonCon party

As promised I am posting another set of costumes that I made for DragonCon 2013.  The Flynn vest was a last minute throw together, but I am loving how it turned out!

Image

Aren’t they cute?

Image

Image

This is my little brother Joel and his friend Caitlin.

A couple more– once again you can see all of these photos and the rest of the shoot on Malland Photography’s Facebook page!

ImageImage

Tomorrow I will be posting my last set: Steampunk Supernatural!

Snow White is ready for Dragon Con!

With only 9 days until Dragon Con I thought I’d show off a some of my costumes that I made.  We did this awesome photo shoot with Malland Photography on Sunday and I’m going post a new set every day.  This set is my Snow White gown and a Prince Charming costume I made for my son.  Enjoy!

Image


I’m pretty excited on how well this turned out and I just think the next photo is simply amazing.

Image


Seriously.  She took crazy good shots.

Image


Isn’t he just the cutest little Prince Charming?

I’ll leave you with this:

Image


Check out the rest of the Snow White photos on her Facebook page and check back for the Tangled shots soon!

Rainbow Dash Dress Tutorial!

image

So at DragonCon last year I got my daughter some Rainbow Dash ears and wings from this lady so of course she needs a dress to go with them right? I kept thinking about how I should do this and decided on a tutu dress, but since it’s Rainbow Dash it needed to be huge and fabulous!

Here is how I did it:

Supplies:

5 yards of Rainbow Dash blue tulle (aka baby blue) OK I used tulle on this but I highly recommend using netting or chiffon because tulle wads up when your walking (running, rolling around, jumping etc).  I am going to redo this skirt before she wears it again.  All steps will be the same though. 

1 yard each of the other colors

1 package of elastic

1/2 yard baby blue fabric (I used a stretchy knit that was on clearance)

Fleece or Felt to make cutie mark (I used felt, but I think fleece would have worked better)

Step one:

I measured around her chest and then added an inch (I have $40 in ears and wings and $30 in fabric so I want this to last as long as possible).  Cut and surge the elastic together. (Hand or regular machine stitches work as well)

Step two:

Measure how long the skirt needs to be then double it and add an inch (hint: fold fabric in half and it helps with cutting OR buy the tulle in spool form and you don’t have to cut near as much.  You will use A LOT more than 5 yards that way though, just because it’s measured differently).  Cut fabric into 3 inch wide strips or if you purchased by the spool, just cut it to the length needed.

image

Obviously they don’t have to look perfect.  Any uneven lines will not be noticed at all.

Step three:

Tie the tulle in knots around the elastic like so:

image

Yes that is a Captain America Shield– I use what I have.  It does make it easier to have the elastic around something.  If you don’t have a Captain America Shield a lamp shade or bucket would work.  However if you don’t have a Captain America Shield you just lost some cool points. (You can buy one here.)

Tie the baby blue tulle around the part that will be the front of the skirt.  I used 4 strips of tulle together for each knot to make it very full.  You could do less if desired, but I wouldn’t recommend doing much more.

Step four:

Do the same for the rest of the colors.  Tie like a maniac.  I recommend watching TV while preforming this mindless task.  I rewatched some Supernatural episodes while doing this and the two hours flew by!  Well at least they went by easier than otherwise.

The final product should look something like this:

image

We took this moment to try on the “RAINBOW DASH TUTU!!!” My daughter was very excited.

image

Now on to the top of the dress:

Step six:

Like I said I bought some baby blue fabric on clearance.  I folded it in half and used my serger to make a blue tube-like top:

image

image

Here is where I fail as a someone writing a tutorial.  I totally just eyeballed this.  I made it the same size as the elastic, and make it longer than I thought I’d need it just to be safe.  Then I serged it all together.  DONE!  Easy right?  OK it really is, so I’m going to assume you followed all that and am moving on.

Step seven:

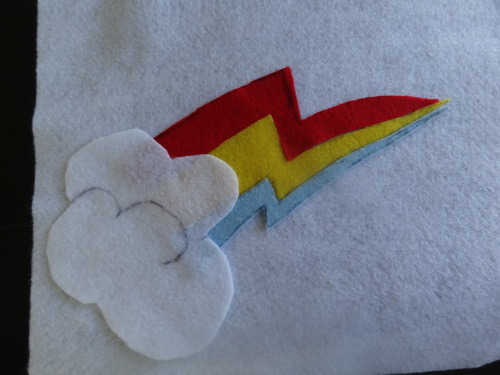
Cutie Mark time!! I Googled images of her cutie mark and then drew the mark piece by piece on the felt.
image

Then I used fabric glue to secure onto another piece of felt.  HOWEVER!!! I do not recommend using fabric glue, or at lease use a lot less than I did.  You’ll find out why in a minute.

I cut out the mark again, leaving a little around the edges then used a button hole stitch in baby blue around the cloud and onto the detail on the cloud.  I also stitched around the lightening bolts in thread that matched each bolt.  Once this is done cut as close to the mark as you can so the back piece of felt is not seen.

image

This is why I am against the use of glue.  It seeped through and made the stitches look dark.  It’s not noticeable in the final product, but I wasn’t happy with it here.  However not so unhappy that I was going to go to the fabric store again to make a third attempt (oh I didn’t mention the one I made way too big?? Oh well, moving on.)

Step eight:

Sew the cutie mark on the top.  Make sure you try the skirt and the top together first so you don’t sew the mark too high or too low.

Step nine:

Straps– Ok I was going to do four straps that would be tied in bows on the shoulders, but at the last minute changed my mind.  Instead I made a halter which I pulled down in the back to make a semi racer back top.  I like this because as she gets bigger I can untack the back part and make it just a halter top.  Also with the wings it was going to be too much around her face.

If you make the straps yourself remember that you have to cut them a lot wider than you would think.  Whenever you turn something, it shrinks a lot.

My straps.  One preturn and one post.  I also serged one end before turning, but since I made it a halter I really didn’t need to do that.

image

Then I sewed the strap into the top, only sewing down one layer so the stitches wouldn’t show through. (I did this by hand, the fabric I chose does not do well on a regular machine and the serge stitch would have been too much).

I put the top on her and then sewed the back part of the strap down while it was on her to make sure that I sewed it up high enough.

Here is the back finished:

image

If you are lazy you can just use ribbon for this step.

Step nine:

Try the top and bottom on together and mark where it needs to meet.  I made the back higher than the front to make a big fluffy rear end.  Also my skirt had more volume in the back. She enjoyed the try on steps.

image

image

Step ten:

Whip-stitch the skirt to the top. This is another good chance to catch up on your favorite TV show.

You are DONE!

Here is the finished product with ears and wings:

image

Pinky Pie!! (Cake)

So I was in charge of making my mother-in-law’s birthday cake this year and when I asked my kids what kind of cake we should make her, the answer was overwhelmingly PINKIE PIE!! (You have to scream it when you say it, but not as loud as you have to scream RAINBOW DASH! when talking about that amazing pony). So of course I listened to my 2 and 5 year old and made this:
PinkiePie

PinkiePie1

PinkiePie2

You know, just what every 57 year old needs for their birthday. Too bad she didn’t know who Pinkie Pie was or that I had done a perfect cutie mark on the top of the cake.