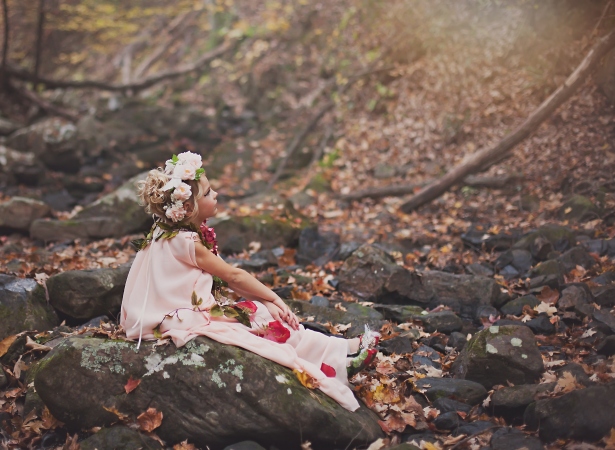
Child Fairy/Wood Nymph Costume

When my daughter asked to be a fairy for Halloween I of course didn’t just buy a fairy costume on Amazon or throw a pair of wings on her dance tutu. I made her become a fairy.


I think it turned out rather fabulous. It was pretty simple to make although fake flowers are wayyyyy more expensive then I thought they’d be.

I made the underdress out of some scrap satin– just a tube dress with ribbon spaghetti straps. I put elastic around the top so that it would go on and off easier. The pink is just chiffon sewn into 2 long rectangles and then criss crossed over her body and tacked in place. I really just sewed it together how it looked the best. If I wanted it to be more gathered in one spot I sewed it there. I knew that with all the flowers on there that washing isn’t an option so that made it so much easier to just sew it how it looked best.


It went together like how the fairies on Sleeping Beauty sewed her dress. Well kinda. It wasn’t at all like sewing a real gown, but it looked beautiful and that’s all that counts right?


The crown is grapevine with flowers wired on and the shoes were old slippers with flowers hot glued on.


This whole project was very much made up as I went along. I held up the flowers/vines to the dress and if I liked it I sewed it on.


But come on. ..

img_9179


Professional photos done by Kim Chaffin Photography


Robin Hood and Maid Marian: A Journey from Sherwood Forest to Hollywood

So I have shown you how big of a nerd I am when it comes to cosplay and that I’ve dragged my family into it too (more than once).  Therefore it shouldn’t be surprising to you to know that I’m quick to throw together a costume for my kids with the slightest provocation.  A few weeks ago my son had me come running into the living room expecting a broken bone, swarming bees, or at least a large spider.  When I got there it turns out he was just screaming because he was so excited about The Hub’s new Halloween contest and we had to enter.  Not only did we have to enter, but we needed to win because he wants that $25,000 for a new Bruder truck (evidently an expensive Bruder).

After reading all the rules I realized that of course none of the costumes that I made for Dragon*Con qualified and I would need to make something new.  After much deliberation I decided on doing Robin Hood and Maid Marian.  Not the Disney version so much as the Errol Flynn.

Robin-Hood-Errol-Flynn-002

While I was making it I had to continually show Langley pictures of this Robin Hood to let him know that it was OK that he wasn’t wearing green from head to foot (once again he stressed me the importance of winning).  What do you think?

DSC_5037

Doesn’t he look like a stunning Robin Hood?  The boots and bow are from Amazon, the white undershirt and pants from Target, but the arm guards, vest, green undershirt, hat and quiver I made.  It is very loosely based on Simplicity pattern 5520, but I made many many changes and additions to it.  The hat I made just messing around and the quiver is a wine gift box covered in fake leather.  I was really happy with the results.

Now on to Gillian’s.  Her Maid Marian is 100% Simplicity pattern 5520.  Well by 100% I mean 95%– I added a gold circlet crown, made the arm bands wider and made it a little more fitted (but it is somewhat adjustable so it will fit her as she grows).  She picked out the fabric so it’s a little gaudier than I was looking for, but she loves it.  And by she loves it I mean that she would wear it every second of every day if I let her.  Which It wouldn’t surprise me if we made a few Target runs in it.  Whatever.  I spent that much time making it, I should let her get as much wear out of it as possible.

DSC_5000

I don’t have to WIN to make Langley happy, I just need to get to Hollywood.  That means I just have to be better than everyone else in Tennessee.  I don’t know that mine is better than everyone’s over all, but I really really hope that no one else in the Volunteer State put this much time or effort into their costumes.  The Hub’s website lets you view the other entrant’s costumes and I would say that perhaps only 15 or so are this fabulous, so here’s hoping that all of those people are good Midwestern folk.  Or perhaps Yankees.  Either is fine with me.  I have my fingers crossed and have a feeling that if we don’t make it to the semi-finals that I might be buying a broken hearted boy that new Bruder truck he’s been wanting.

Our submission

This slideshow requires JavaScript.

Shirley Temple Inspirations

I’ve always loved Shirley Temple. Like as long as I can remember I have thought she was the most amazing person ever and I don’t know that my has opinion has changed at all over the years. I still cry every single time her mom dies (yes it happens every movie) and smile when she sings and dances. My Shirley Temple obsession + giving birth to a blonde little girl+ my love for costumes inevitably led to this photo shoot:

Inspiration:
Shirley Temple1

Homage:

547763_576971975673012_1076211300_n

1239716_576971965673013_1381572092_n

13889_576971942339682_66955783_n

Inspiration:
Shirley Temple3

Shirley Temple4

Shirley Temple6

Shirley Temple

Shirley Temple2

Homage:

1234298_576972019006341_1142244072_n

1236443_576972045673005_797290137_n

1231133_576972005673009_348261076_n

998964_576972055673004_451726371_n

Inspiration:
Shirley Temple 5

Homage:

544892_576972112339665_621290181_n

971440_576972079006335_1915550605_n


All my homage photos were taken by Malland Photography who I am heartbroken is moving to Louisiana, but am so happy she squeezed this shoot in before her relocation.  I am a little jealous that my baby got to pretend to be Shirley Temple for a few hours.

Become A Star For A Day

DragonCon is over.  Another year of costuming, staying up too late, getting up too early, exposing my son to something that is somehow both awesome and inappropriate at the same time, and what is most amazing: feeling like a star.

I had someone ask me why do this.  Not just why I go (even though I think that they had doubts about that as well), but why I spent so much time and money on making costumes for this event.  At the time I didn’t really know the answer.  After seeing the amazing creations last year I thought that I had the ability  to create something amazing so I wanted to prove to myself that I could do it.  That may have been my reason for starting, but I know my reason (and I think other’s reason) to continue.  It was amazing to have people stop me in the halls and ask for my photo.  It’s what I would imagine being famous feels like, except at the end of the day I got to shower and turn into myself again.

OK so Steampunk Supernatural went over well.  I had more people “get” it than I thought I would (I think a whopping 10 people that didn’t have to ask who we were– which was about 8 more than I expected) and had a lot of compliments just on the general awesomeness of it.  I got recognized by someone who reads my Tumblr which made my day and then I also got to do a CNN photo shoot about rule 63.

However, it wasn’t until I was dressed as Snow White that I began to feel the awesomeness.  No explanation was needed here.  In a sea of Ariels, Auroras, Tinkerbells and Cinderellas it was easy to stand out of the crowd.  It took me twice as long to get anywhere, I got called the wrong princess’ name numerous times, but I loved every second.  While on the Walk of Fame I even had “Once Upon a Time” star Raphael Sbarge ask ME for a picture!  Yeah that was pretty awesome.

Image

When I walked by small children I could hear there excited whispers and I watched them gather the courage to talk to me.  It truly was magical.  To them I was  Snow White just like for my son every Spider-Man or Captain America we passed was, in his eyes, THE superhero.   It’s an amazing feeling and I can see why people go to numerous cons a year and spend thousands on costumes.  Do I think it’s as competitive as “Hero’s of Cosplay” portrays it– no, not for the average congoer, but it’s crazy the things people can construct. create and imagine that makes cosplay special.

So if you still don’t understand why I recommend you hit up the nearest con (a larger one to guarantee that you’ll get to see some awesome costumes) and do some people watching.  Maybe you’ll get it then.

Check out some of the highlights of my weekend:

Saving People, Hunting Things, The Family Business

Supernatural is one of my favorite shows (OK so I have about 10 shows I could say that about, but I can’t help that I become obsessed with so many things!)  Last year at Dragon Con I did a thrown together cosplay of Sam all by myself and had a total of 1 person know who I was (he was dressed as Cas so that helped).  This year I wanted to do it up right and instead of doing straightforward rule #63 changes I decided to mix it up even more with a steampunk slant.  I peer pressured my brother and his friend to be the Dean and Castiel to my Sam.  Here are the results:

(all photos by Malland Photography)

costumes (87)

Sam and Dean

costumes (60)

Castiel

What do you think?

Here are some more to help you make up your mind:

costumes (54)

This is my favorite of my Sam

costumes (65)

That leather corset was a pain to make, but I’m pretty jealous she gets to wear it

costumes (64)

costumes (82)

So what do think?  Do you have suggestions?  After all we have 7 more days so I’m sure I could whip up something 🙂

While you’re thinking I’ll leave you with some Destiel love:

costumes (85)

Rapunzel and Flynn join the DragonCon party

As promised I am posting another set of costumes that I made for DragonCon 2013.  The Flynn vest was a last minute throw together, but I am loving how it turned out!

Image

Aren’t they cute?

Image

Image

This is my little brother Joel and his friend Caitlin.

A couple more– once again you can see all of these photos and the rest of the shoot on Malland Photography’s Facebook page!

ImageImage

Tomorrow I will be posting my last set: Steampunk Supernatural!

Rainbow Dash Dress Tutorial!

image

So at DragonCon last year I got my daughter some Rainbow Dash ears and wings from this lady so of course she needs a dress to go with them right? I kept thinking about how I should do this and decided on a tutu dress, but since it’s Rainbow Dash it needed to be huge and fabulous!

Here is how I did it:

Supplies:

5 yards of Rainbow Dash blue tulle (aka baby blue) OK I used tulle on this but I highly recommend using netting or chiffon because tulle wads up when your walking (running, rolling around, jumping etc).  I am going to redo this skirt before she wears it again.  All steps will be the same though. 

1 yard each of the other colors

1 package of elastic

1/2 yard baby blue fabric (I used a stretchy knit that was on clearance)

Fleece or Felt to make cutie mark (I used felt, but I think fleece would have worked better)

Step one:

I measured around her chest and then added an inch (I have $40 in ears and wings and $30 in fabric so I want this to last as long as possible).  Cut and surge the elastic together. (Hand or regular machine stitches work as well)

Step two:

Measure how long the skirt needs to be then double it and add an inch (hint: fold fabric in half and it helps with cutting OR buy the tulle in spool form and you don’t have to cut near as much.  You will use A LOT more than 5 yards that way though, just because it’s measured differently).  Cut fabric into 3 inch wide strips or if you purchased by the spool, just cut it to the length needed.

image

Obviously they don’t have to look perfect.  Any uneven lines will not be noticed at all.

Step three:

Tie the tulle in knots around the elastic like so:

image

Yes that is a Captain America Shield– I use what I have.  It does make it easier to have the elastic around something.  If you don’t have a Captain America Shield a lamp shade or bucket would work.  However if you don’t have a Captain America Shield you just lost some cool points. (You can buy one here.)

Tie the baby blue tulle around the part that will be the front of the skirt.  I used 4 strips of tulle together for each knot to make it very full.  You could do less if desired, but I wouldn’t recommend doing much more.

Step four:

Do the same for the rest of the colors.  Tie like a maniac.  I recommend watching TV while preforming this mindless task.  I rewatched some Supernatural episodes while doing this and the two hours flew by!  Well at least they went by easier than otherwise.

The final product should look something like this:

image

We took this moment to try on the “RAINBOW DASH TUTU!!!” My daughter was very excited.

image

Now on to the top of the dress:

Step six:

Like I said I bought some baby blue fabric on clearance.  I folded it in half and used my serger to make a blue tube-like top:

image

image

Here is where I fail as a someone writing a tutorial.  I totally just eyeballed this.  I made it the same size as the elastic, and make it longer than I thought I’d need it just to be safe.  Then I serged it all together.  DONE!  Easy right?  OK it really is, so I’m going to assume you followed all that and am moving on.

Step seven:

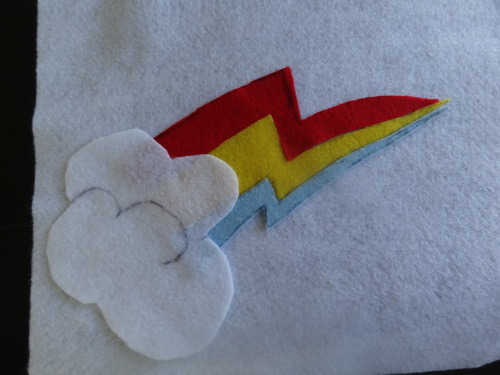
Cutie Mark time!! I Googled images of her cutie mark and then drew the mark piece by piece on the felt.
image

Then I used fabric glue to secure onto another piece of felt.  HOWEVER!!! I do not recommend using fabric glue, or at lease use a lot less than I did.  You’ll find out why in a minute.

I cut out the mark again, leaving a little around the edges then used a button hole stitch in baby blue around the cloud and onto the detail on the cloud.  I also stitched around the lightening bolts in thread that matched each bolt.  Once this is done cut as close to the mark as you can so the back piece of felt is not seen.

image

This is why I am against the use of glue.  It seeped through and made the stitches look dark.  It’s not noticeable in the final product, but I wasn’t happy with it here.  However not so unhappy that I was going to go to the fabric store again to make a third attempt (oh I didn’t mention the one I made way too big?? Oh well, moving on.)

Step eight:

Sew the cutie mark on the top.  Make sure you try the skirt and the top together first so you don’t sew the mark too high or too low.

Step nine:

Straps– Ok I was going to do four straps that would be tied in bows on the shoulders, but at the last minute changed my mind.  Instead I made a halter which I pulled down in the back to make a semi racer back top.  I like this because as she gets bigger I can untack the back part and make it just a halter top.  Also with the wings it was going to be too much around her face.

If you make the straps yourself remember that you have to cut them a lot wider than you would think.  Whenever you turn something, it shrinks a lot.

My straps.  One preturn and one post.  I also serged one end before turning, but since I made it a halter I really didn’t need to do that.

image

Then I sewed the strap into the top, only sewing down one layer so the stitches wouldn’t show through. (I did this by hand, the fabric I chose does not do well on a regular machine and the serge stitch would have been too much).

I put the top on her and then sewed the back part of the strap down while it was on her to make sure that I sewed it up high enough.

Here is the back finished:

image

If you are lazy you can just use ribbon for this step.

Step nine:

Try the top and bottom on together and mark where it needs to meet.  I made the back higher than the front to make a big fluffy rear end.  Also my skirt had more volume in the back. She enjoyed the try on steps.

image

image

Step ten:

Whip-stitch the skirt to the top. This is another good chance to catch up on your favorite TV show.

You are DONE!

Here is the finished product with ears and wings:

image