
So at DragonCon last year I got my daughter some Rainbow Dash ears and wings from this lady so of course she needs a dress to go with them right? I kept thinking about how I should do this and decided on a tutu dress, but since it’s Rainbow Dash it needed to be huge and fabulous!
Here is how I did it:
Supplies:
5 yards of Rainbow Dash blue tulle (aka baby blue) OK I used tulle on this but I highly recommend using netting or chiffon because tulle wads up when your walking (running, rolling around, jumping etc). I am going to redo this skirt before she wears it again. All steps will be the same though.
1 yard each of the other colors
1 package of elastic
1/2 yard baby blue fabric (I used a stretchy knit that was on clearance)
Fleece or Felt to make cutie mark (I used felt, but I think fleece would have worked better)
Step one:
I measured around her chest and then added an inch (I have $40 in ears and wings and $30 in fabric so I want this to last as long as possible). Cut and surge the elastic together. (Hand or regular machine stitches work as well)
Step two:
Measure how long the skirt needs to be then double it and add an inch (hint: fold fabric in half and it helps with cutting OR buy the tulle in spool form and you don’t have to cut near as much. You will use A LOT more than 5 yards that way though, just because it’s measured differently). Cut fabric into 3 inch wide strips or if you purchased by the spool, just cut it to the length needed.

Obviously they don’t have to look perfect. Any uneven lines will not be noticed at all.
Step three:
Tie the tulle in knots around the elastic like so:

Yes that is a Captain America Shield– I use what I have. It does make it easier to have the elastic around something. If you don’t have a Captain America Shield a lamp shade or bucket would work. However if you don’t have a Captain America Shield you just lost some cool points. (You can buy one here.)
Tie the baby blue tulle around the part that will be the front of the skirt. I used 4 strips of tulle together for each knot to make it very full. You could do less if desired, but I wouldn’t recommend doing much more.
Step four:
Do the same for the rest of the colors. Tie like a maniac. I recommend watching TV while preforming this mindless task. I rewatched some Supernatural episodes while doing this and the two hours flew by! Well at least they went by easier than otherwise.
The final product should look something like this:

We took this moment to try on the “RAINBOW DASH TUTU!!!” My daughter was very excited.

Now on to the top of the dress:
Step six:
Like I said I bought some baby blue fabric on clearance. I folded it in half and used my serger to make a blue tube-like top:


Here is where I fail as a someone writing a tutorial. I totally just eyeballed this. I made it the same size as the elastic, and make it longer than I thought I’d need it just to be safe. Then I serged it all together. DONE! Easy right? OK it really is, so I’m going to assume you followed all that and am moving on.
Step seven:
Cutie Mark time!! I Googled images of her cutie mark and then drew the mark piece by piece on the felt.
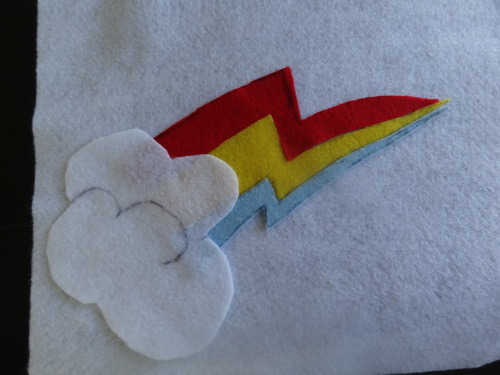
Then I used fabric glue to secure onto another piece of felt. HOWEVER!!! I do not recommend using fabric glue, or at lease use a lot less than I did. You’ll find out why in a minute.
I cut out the mark again, leaving a little around the edges then used a button hole stitch in baby blue around the cloud and onto the detail on the cloud. I also stitched around the lightening bolts in thread that matched each bolt. Once this is done cut as close to the mark as you can so the back piece of felt is not seen.

This is why I am against the use of glue. It seeped through and made the stitches look dark. It’s not noticeable in the final product, but I wasn’t happy with it here. However not so unhappy that I was going to go to the fabric store again to make a third attempt (oh I didn’t mention the one I made way too big?? Oh well, moving on.)
Step eight:
Sew the cutie mark on the top. Make sure you try the skirt and the top together first so you don’t sew the mark too high or too low.
Step nine:
Straps– Ok I was going to do four straps that would be tied in bows on the shoulders, but at the last minute changed my mind. Instead I made a halter which I pulled down in the back to make a semi racer back top. I like this because as she gets bigger I can untack the back part and make it just a halter top. Also with the wings it was going to be too much around her face.
If you make the straps yourself remember that you have to cut them a lot wider than you would think. Whenever you turn something, it shrinks a lot.
My straps. One preturn and one post. I also serged one end before turning, but since I made it a halter I really didn’t need to do that.

Then I sewed the strap into the top, only sewing down one layer so the stitches wouldn’t show through. (I did this by hand, the fabric I chose does not do well on a regular machine and the serge stitch would have been too much).
I put the top on her and then sewed the back part of the strap down while it was on her to make sure that I sewed it up high enough.
Here is the back finished:

If you are lazy you can just use ribbon for this step.
Step nine:
Try the top and bottom on together and mark where it needs to meet. I made the back higher than the front to make a big fluffy rear end. Also my skirt had more volume in the back. She enjoyed the try on steps.


Step ten:
Whip-stitch the skirt to the top. This is another good chance to catch up on your favorite TV show.
You are DONE!
Here is the finished product with ears and wings:


3 thoughts on “Rainbow Dash Dress Tutorial!”